Finishing Ideas for Handcrafts
Scissors Biscornu Freebie
3 Comments
Here is the Scissors Biscornu Freebie as a pdf file.
Thanks, Lady P, for the suggestion.
And Barbarah – the second page is for you!
A Biscornu Tip – and a Freebie
1 Comment
Who doesn’t love biscornus (or tuffets, as they are sometimes called)?
Many sites have finishing instructions for biscornus; http://focusonfinishing.wordpress.com/useful-links/ lists several.
Here’s my little tip for finishing biscornus – mark the centers of each side with straight pins – you’ll be able to match those corners exactly, and keep your stitching from going all cattywampus – lol!
 The pattern is from the Yahoo Groups wXSw, where we are SAL-ing Halloween tree ornaments.
And – here I enter the world of amateur designers – it’s a little freebie for you. Please respect my work, don’t claim it as your own, and don’t publish it on another site. Thanks!
Do feel free to use your choice of colors and fabrics – take a chance!
 I’m currently stitching this in the colors of the rainbow, using DMC Color Variations – I’ll post a pic when done.
Scissor Fob Finishing
Leave a Comment
I love the scissor fobs featured at http://www.drawnthread.com/FreeCharts.html.
 This chart is a freebie from http://www.caseybuonaugurio.com/, another one I stitched for my Halloween Tree, a SAL at the Yahoo Group wXSw.
I like to finish smalls by hand, rather than machine. I feel it gives me better control aligning the threads of my stitched piece. And when finishing by hand, I adore the method of backstitching around my piece, and then whipstitching the edges together from the right side. Here is my own twist on finishing a scissor fob type ornament.
If you have problems accessing the PowerPoint presentation, email me and I’ll send you the jpegs.
Enjoy!
Ornaments – Felt Frame
Leave a Comment
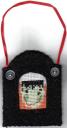
I’ve been stitching ornaments for a Halloween tree with the Yahoo Group wXSw. I’ve actualy finished a few, and took some pics along the way. Here’s the first:
Click on each thumbnail for a full size view.
Step 1: Cut out an interesting frame shape from felt, both front and back – I used black glitter felt.
Step 2: Trace around the frame shape with a pencil. 
Step 3: Cut out one or two threads inside your pencil line. I put a piece of black felt behind the cut line to make it easier to see.
Step 4: place your stitched piece on the wrong side of the back frame. You can run a bead of fabic crafter’s glue around the edges, or

Step 5: place a hanger, and then the top frame, and whipstitch the edges together.  For the hanger, you can use a ribbon, twisted cord, or whatever your little heart desires.
TIP: I did a simple running stitch around the edge of the frame opening with a single strand of matching floss, to anchor the stitched peiece exactly where I wanted it.
Step 6: Add embellishments as desired.
Remember – you can use any color felt – pick what you like to fit the season.
Enjoy!
Finally!
Leave a Comment
After a very long period of time, where RL just kept on getting in the way, I finally have some content to post. Stay tuned!
