Finishing Ideas for Handcrafts
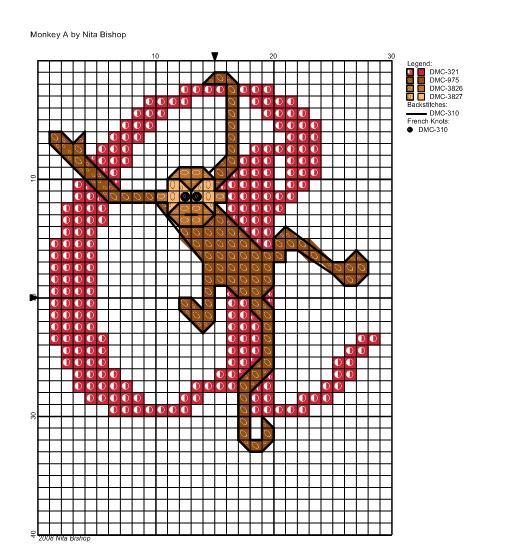
Monkey Alphabet
11 Comments
A few weeks ago, a member of the EMS Cross Stitch Board was looking for a Monkey Alphabet. Curious, I did a Google, and couldn’t find hide nor hair of one! Well, that just can’t be! So I set myself down with my PC Stitch Pro and designed one. Warning – there are lots of fractionals in the monkeys!
Over the next several weeks, I’ll be publishing it here. The single letter patterns are in color, while the double letter patterns are symbols only. Enjoy!
-

- Monkey Alphabet


Mama’s Violets
3 Comments
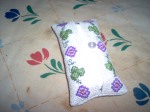
What do you give a Mama for Mother’s Day? My Mama is in her seventies, lives in a small home with very limited wall space and has a life-long dislike of “dust collectors”. But she loves flowers and violets are one of her favorite flowers. So I stitched up this little freebie from ABC Free Cross Stitch Patterns (I saved it back in 2004, but when I just checked, it was shown on their Free Patterns page). With the addition of a simple heart and leaves border on either side (using colors from the chart), I made this pocket tissue holder
I used four threads (2 threads for backsitiching) on an 11 count beige aida, which has gold threads woven throughout (the pictures do not even hint at how sparkly it is!) – the manufacturer is unknown. I received this fabric as a lagniappe from an Ebay vendor when I purchased some round plastic frames for Christmas ornaments
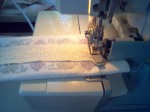
Here are the critical dimensions: Border areas are each 1-5/8 X 5-3/4 inches (4 X 14.5 cm). The main area is 3-1/4 X 5-3/4 inches (8 X 14.5 cm). Allow at least ½ inch (1.5 cm) to turn under at the borders for the opening and for side seams. BTW, even though I serged the edges of this fabric, and sewed it by machine, it is entirely possible to do all the finishing by hand.
Wash, block and iron the finished stitching.
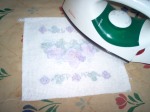 For items that will be handled, I like to iron on interfacing to the wrong side. It serves the dual purpose of protecting the stitching and helps prevent any thread from working it’s way loose.
 Turn under hem at each border edge. I top-stitched the hem with a
  neutral color thread, but you might want to use a color from your design and hand stitch a decorative hem.
Fold the border edges to the center of the design, wrong sides together. Stitch the seam on each raw side. Trim and finish the seam by serging, zig-zagging or overcast by hand (we don’t want pesky little threads coming out each time a tissue is pulled from tissue holder, do we?)
Turn the holder right side out and press. ( A knitting needle is useful to turn those corners!)
 Fill with pocket tissues. In a pinch, you can fold regular size tissues to fit.
Turned out that the opening gapped with tissues inside – so I added a button and ribbon loop to help keep it closed.

Goodbye Mariperles
1 Comment
We mourn the loss of a talented and generous lady: Mariperles http://mariperles.over-blog.com/
I didn’t know her personally, but enjoyed her blog and her designs. To honor her, I am sharing a design I have been working on for a little while.

