Finishing Ideas for Handcrafts
Bah, Humbug!
2 Comments
Not really. I love humbugs, those sweet stuffed smalls. They remind me of biscornus – you can use them as an ornament, a pin cushion, a scissors fob or what ever your little heart desires. They can be tiny, or as big as you want to make one!
Construction is really simple.

A Little Humbug Tutorial
And now that you’ve learned how to make a Humbug, how about some sample charts?
First, a little geometric, kind of Quaker-y influenced:
 Can’t you see those red stitches replaced by red beads?
Or how about a traditional style pattern?
 And because, after all, it is me – a Butterfly chart:
 These all will finish at approximately 3 X 3 inches on 14 count or 28 count, stitched over 2. All pics are clickable to see a larger view. Then use your browsers back button to return to this page.
As always, I’d love to hear from you. And if you stitch one of my charts, won’t you please send me a picture?
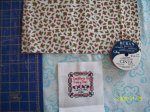
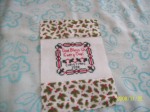
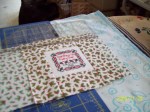
Floss Wallet
2 Comments
I’ve been working on this idea for a while. I love the little zip-loc bags to keep my floss in, and I normally use a ring to keep all the little baggies for a project together. But what’s the use of being a cross-stitcher if you can’t make a little useful item, right?
TIP: When combining cross stitch and fabric – pick your fabric first – then choose your floss. It’s much easier to find the right floss colors to use with a fabric – not so easy to find fabric to match an existing cross stitched project.
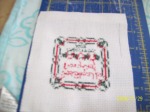
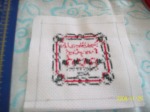
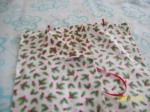
The chart I used for this project is Petit Abécédaire aux Fleurs.
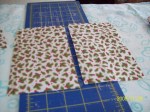
1. Cut two pieces of fabric 7 x 11 inches for the inside and outside of the Floss Wallet. 
2. Cut one piece of fabric 7 x 6 inches (for frame lining).
3. Cut two pieces of fabric 4 x 7 inches for two pockets. Fold under a ½ inch hem on each pocket, apply lace trim to the right side, if desired. 
4. Top stitch the lace in place, catching the hem as you go. 
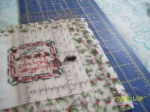
5. Pin the pockets to either end of the lining (inside) fabric, right sides up. If you want to make a divided pocket, fold the lining in half lengthwise and mark the center. 
6. Top stitch the center line (the pencil is pointing to the top stitching). 
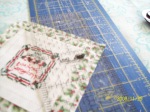
7. Find the center of the 7 x 6 inch piece of fabric and mark it on the wrong side. 
8. Measure the cross stitched piece to determine the size opening you need. 
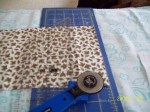
9. Mark the opening size on the wrong side of the 7 x 6 inch piece of fabric, centering on your mark. I wanted to have curved corners, so I used the handle of my rotary cutter to mark curves at each corner. 
10. Lay the 7 x 6 inch fabric, right sides together, on one end of the 7 x 11 outside piece, matching the corners. Pin securely (I believe in using straight pins – they give you 300 hundred in that little box for a reason, right?). 
11. Stitch on the marked line. Cut out the center, leaving about ¼ inch seam allowance, and clip the inside curves nearly to the stitching. 
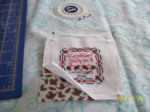
12. Turn the lining thru the center to the wrong side. Press the seam flat. Lay the opening over your stitched piece and center it in the opening. 
13. Trim the stitched fabric to match your fabric and pin around the edges thru all three layers. 
14. Forgot about cutting a tab – cut a scrap of fabric about 6 x 1-1/2 inches – fold in half lengthwise and stitch the long sides. 
15. I again used the handle of my rotary cutter to mark a curve on the folded end of the tab and stitched along that curved line. Trim the seam and clip the curve.  Turn the tab right side out.
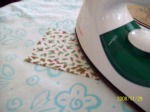
16. Lay the front piece down right side up. Lay the lining piece on top of it right side down. Put the tab in between the two pieces at the center of the short end, matching the raw edges. Sew a ½ inch seam along the two long ends and across the short end where the tab is. Trim the seam and clip the corners (sorry, the photos of these steps didn’t come out – I didn’t realize my camera batteies were nearly dead.)
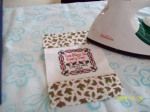
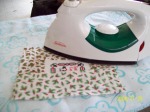
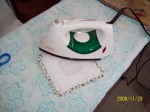
17. Cut two pieces of iron on quilt batting 5-¾ inches by 10 inches. Cut out four holes 1 inch in from the sides and about ½ inch from the center (to allow for grommets) . Iron the batting to each of the wrong sides. 
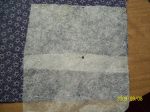
18. Be sure to use a pressing cloth to iron the batting in place. This is what happens if you get impatient and don’t use a cloth. 
19. Turn the wallet right side out. Mark the positions of the four grommets. Don’t apply the grommets yet! 
20. Cut two pieces of thin cardboard, each 6 inches by 4-1/4 inches.
21. Slide one piece of cardboard inside the wallet between front and back batting, all the way to the end. Apply the four grommets.  And yes, that’s a Crop-o-dile peeking in from the edge of the photo!
22. Slide the second piece of cardboard inside the wallet and push down to the grommets. 
23. You may have noticed that I had applied a snap closure. Unfortunately, after I applied it, I tried it out, and it wouldn’t snap! So I had to pry off the snap, and sew on a button instead.  I made a matching button hole in the tab.
Fold under the raw edges on the open end 1/4 inch, and whipstitch it closed. I used matching floss. (You can barely see the pins holding the opening closed in the above photo).
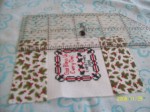
24. Here’s the inside of the wallet, with a packet of needles in one pocket and my scissors in the other. 
25. And the inside with some floss baggies on the rings (which went thru the grommets). These are the flosses I’m using for a current project (shh – it’s a secret!) 
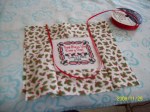
26. The back of the outside, showing the tab buttoned. 
27. And the front. 
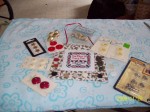
28. Here it is standing up, so you can see some of my mess scattered around the table – lol! 
And here is the chart I’m planning to use for my next wallet.  If you’d like to use this chart, feel free to take a copy for your personal use – and please send me a photo of your project!
Your comments, questions and suggestions are welcome.
Thanks for visiting today!
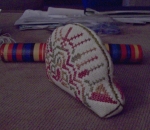
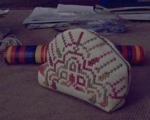
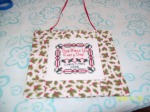
Quaker Hedgehog Pyn Pillow
Leave a Comment
I know you’ve seen the free chart for a Hedgehog Quaker on The Workbasket. When I first saw it, I immediately conceived the idea for this Pyn Pyllow:
I stitched it with some beautiful floss I received from Iza with the floss tag she stitched for me for the Tiny Treasures Floss Tag Exchange. I’ve emailed both Candy and Mary at The Workbasket to ask their permission to post the directions for finishing this little treasure on my blog, but I haven’t heard from either one yet.
So, I’m going to go ahead and share my finishing idea for this Pyn Pillow. Please Click on this link and then right click and save the pdf file to your computer: Hedgehog_Quaker_by_The_Workbasket (I’ll figure out an easier way some day!)

If you use my finishing idea, won’t you please send me a picture? My email is on the About Me page, towards the bottom.
And I’d love to have your comments about this finishing tutorial!
Thanks for visiting today.
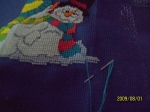
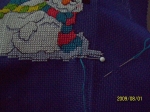
Snowman Love Part 3
Leave a Comment
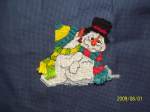
At Long Last – Snowman Love is Finis!
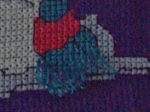
I included a specialty stitch – I used Turkey Work for the fringe on the little snow people’s scarves.
Turkey Work is really easy. If you’ve never done it, don’t be afraid. Start with a back stitch,

take a loop, and back into the next hole (I use a straight pin to keep my loops from pulling thru), 
then repeat.
Just continue taking a back stitch and then a loop, following the contours of the scarf and moving the straight pin as needed. BTW, I work from right to left, but it doesn’t matter – whichever way is more comfortable for you. Before you know it, you’ll have a whole row of Turkey Work.
You can cut the loops, if you want to, but I prefer the loops.
Continue the Turkey Work on the snow lady’s scarf.
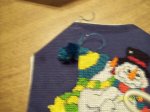
One last 3-D touch – a pom-pom for the snow lady’s hat!
I haven’t actually attached the pom-pom yet – I won’t do that until near the end of finishing.
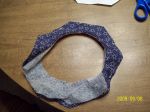
Prep the ornament by washing and pressing – be careful not to crush down the Turkey Work!
I’m making a tuck frame for this ornie. To make the backing, I use a used dryer sheet (or in this case, two dryer sheets)
I made a paper pattern of the shape I wanted, and cut out the front and back of the ornie.
That circle in the middle is the exact size I want for the opening of my tuck frame, so I can sew along the opening without removing the paper pattern.
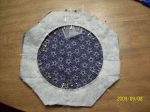
Cut out the center leaving a small seam allowance,
clip along the curve nearly to your stitching,
and turn the dryer sheet lining to the inside.
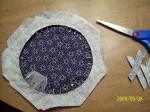
Pin the front frame to the backing piece, right sides together. Don’t forget to put in a hanger! I’m using a pretty piece of ribbon.  Sew along the outside edges, and trim the seam close to your stitching.
Turn everything out to the right side, and press it well.
Back your ornament with iron on interfacing (I use a fusible low loft batting designed for quilting) and trim to fit the Tuck frame.
The white line is from my chalk pencil – I forgot to brush it off before I took this pic – lol!
Now attach the pom-pom to the snowlady’s hat (use the long stings left from making the pom threaded thru your needle and stitched from the front of the ornament to the back  – tie a square knot on the back to secure. Sorry the pic is so blurry – you can tell it’s getting late!
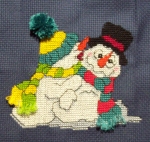
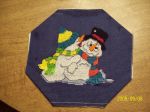
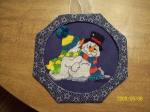
Insert the ornie into the tuck frame – and Ta-Da! 
If you want more detailed info on making a tuck frame you can check here.
Well, what do you think? I’d love to get your comments on my little ornament.
.
.
.
.
.
.
.
.
.
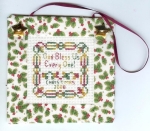
Betcha thought I forgot that I promised to publish the chart for you!
Well, I didn’t.

Here it is, in two versions, color and black/white symbols, so you can take the one you want!

Please, if you stitch one of my designs, send me a picture.
Oh yes, and all the usual legal stuff – don’t claim my work as your own, you may stitch my design for yourself or as a gift, if you want to sell a finished piece, please be polite and ask my permission and give me credit for the design, don’t post thecharts on another site, but feel free to post a link to my blog, ya-da-ya-da, etc.

Snowman Love Part 2
Leave a Comment
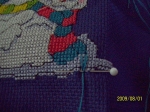
I’ve not made the progress on this that I had wanted to – I still have the facial features to backstitch and the specialty stitches to go.

Can you see the tiny white French knots in the eyes? When I took painting classes, we were always told that a touch of white in the pupils adds life to a painting. Do you think the principle transfers to cross-stitch? I do think the backstitching is critical in this design. Compare the pic above with this one:

I have been busy with other things – chronicled tonight on Nita’s Notes.
Next update will be the final backstitching, specialty stitches, the finishing and then I’ll publish my chart – as a freebie, natch.
So, what do you think thus far?
Snowman Love Part 1
3 Comments
I thought I might share the steps I took in developing an original cross stitch chart from start to finish.
I’ve mentioned before that I have PC Stitch Pro, so these notes refer to steps I took with that program.
First – the idea. Here’s a scan of the pencil sketch I made.

A little faint in the scan, so I took a fine tip marker and darkened it some.

I knew I was going to use 14 count aida, and that I wanted an ornament about 3 inches tall, so I used my photoshop software to reduce the scan to 3 inches tall. That made it about 3 ¾ inches wide.
In PC Stitch, I open a blank chart and set my dimensions. Then I underlayed the scan of my sketch.

After a little playing around with backstitch lines (I used 321 Red so that I could clearly see my underlayed sketch), I had a workable outline.

Clear the underlay and change the outline to black, and I’m ready to start adding color.

First the white.

Hmm, needs a little shading to define the areas.

I don’t like to do ¼ or ¾ stitches on aida, so I’m only using full cross stitches.

I love yellow and turquoise together.

I like those two colors – now I need some punch.

Red and green are good christmas colors.

My little snowman is blushing!

If possible, I like to use the same color in a couple of different areas.

Orange carrot noses, check!

Black hat and charcoal eyes.

A little highlighting and finishing touches.

And here’s my stitching thus far.

Next time – backstitching, french knots, some specialty stitches and the finishing.
So, what do you think thus far?
Ornament Finishing 3
3 Comments
Sewn Tuck Style Fabric Ornament
What you need:
Stitched design
Scraps of coordinating fabric
Small amount of batting (wadding)
Short piece of ribbon (for hanger)
Equipment:
Scissors (sharp, please!)
Sewing Machine
Coordinating sewing thread
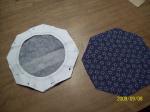
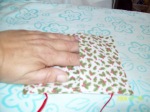
Cut four squares of fabric – mine are 4” x 4″ (for this rather small snowflake design)  step 01
An example using red and green fabric – red is the outside and green is the inside.  step 1A
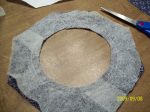
Mark a circle in the center on the wrong side of one square – you can see my very scientific method of marking a precisely sized and placed circle!  Step 02
Sew around the circle – I used red thread so the stitching line would show for the photo – normally I would use a thread that matched the fabric.  Step 3A
Sewn circle
Trim the circle out about a 1/4″ seam and notch – be careful not to cut your stitching.  Step 04
Cutting out the circle.  Step 4A
The circle cut out and notched.  Step 4B
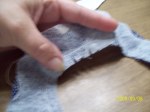
Preparing to turn the top layer thru the circle.  Step 5A
Turn the top layer thru the circle and match the corners. Pin them. When you have matched all four corners, the circle should lay flat.
The first corner pulled thru the circle.  Step 5B
The first corner turned and pinned; preparing to turn the second corner.  Step 5C
The second corner turned and pinned.  Step 5D
One more corner to go. Step 5E
Turning the last corner.  Step 5F
And here it is, all turned.  Step 06
All turned thru and pinned!  Step 6A
The other side of the front piece.  Step 6B
Cut two pieces of batting (my British friends would say wadding) and use the same scientific method to mark a circle in the center of one of them. Cut out the circle from the center.  Step 07
Insert the batting between the two layers – one for the circle piece, the other for the backing.  Step 08
Showing the order of the layers – batting between the two layers of the back pieces and batting between the front pieces.  Step 8A
I wanted a hanger in the corner, and used a 1/4″ grosgrain ribbon inserted between the circle piece and the backing piece.  Step 09
Sew all around the four sides with a 1/4″ seam – you are going to turn this thru the center circle, so you don’t have to leave any side not sewn. Trim the corners and turn.  Step 10
Trim your stitched piece, if needed.  Step 11 b
Tuck the stitched piece into the frame (I use crochet hooks a lot for this sort of thing – the end is pointy but not sharp).  Step 11 c
Ta-Da!  Step 11 d
Things I learned:
A. This took about 45 minutes to cut out and assemble – it honestly took longer to upload all the photos than it did to make it. I expect the next ones will go faster, because I won’t be stopping to photograph each step – lol!
B. Trim the batting squares 3/8″ smaller than the fabric squares so the seams won’t be so thick – I sewed right thru the batting, and it made it thick on the edges.
C. To make the center puffier, insert a circle of batting behind the insert.
D. It would probably be a good idea to make the lining squares in a solid color to match whatever you are going to insert – you can see the print if you look closely at the center.
This ornament can be made for any holiday – or no holiday at all! The center shape doesn’t have to be a circle (nor does the outer shape, for that matter!).
I wouldn’t recommend a very complex shape. Try a triangle, square, oval, or maybe a stocking shape, a star or a gingerbread shape. Cookie cutters and coloring books can give you some good ideas. Here are some simple shapes (enlarge or reduce as needed) to get you started:


Please, if you make an ornament using this idea – send me a picture – I’d love to see what you do with it.
Ornament Finishing 2
1 Comment
I want to share some ornament finishing ideas with you – so here is another one.
Here’s a simple fabric finish that I used for an ornament exchange last year:
 Bless Us Ornament (Lots and lots of pics!) (This was stitched with WDW Christmas)
1. Gather your materials: Stitched piece, fabric, ribbon, thread, fusible padding, stitch witchery(the kind intended for hems), buttons or other embellishments.
2. Measure out from the stitching (1-2” to 3-4”)

3. Cut two strips of fabric the width of your stitched piece by about 3 inches.
4. Pin the strips, right sides facing, to the top and bottom.
5. Sew along your marked lines.
6. Open, and
7. Press
8. Measure the total length and 
9. Cut two more strips of fabric the length by about three inches.
10. Pin right sides facing and
11. Sew, then
12. Press open
13. Cut a piece of fabric the height of your front and two inches wider than the width,
14. Cut this piece in half down the middle.
15. Turn under 1-2 inch and press on one side 
16. Don’t forget to pin a length of ribbon to the top right side of your ornament (we won’t mention that I frequently forget this important step – lol!)
17. Lay the two pieces of backing, right side up, and with the folded edge on top towards the center (I have the corner turned back just to show you the folded edge).
18. Place the ornament front, right side down over the backing pieces and pin. I bring the ribbon hanger out through the opening in the back so I won’t accidentally sew it in the sides.
19. Sew around all four edges.  At the corners, stop stitching 2 or 3 stitches from the corner, turn to 45 degrees, and sew to the next side, then turn and complete sewing the side.
20. Trim seams and
21. Corners
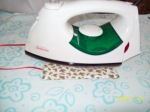
22. Cut a piece of fusible padding slightly smaller than the finished ornament – trim the corners to reduce bulk.
23. Iron in place
24. Turn the ornament right side out.
25. Cut a length of the stitch witchery to fit the opening (Do you see the price – I don’t have any idea how old this is or when I bought it, but by the price, it was a lo-o-o-ong time ago – lol!)
26. Tuck the stitch witchery into place under the folded edge in back.
27. Press to secure.
28. Embellish with buttons, jingle bells, charms or whatever you desire! Have fun! And do let me know what you think – I love hearing from you.


Ornament Finishes I
1 Comment
Plastic Frame Ornament
One of the simplest finishes has to be using a plastic ornament frame. These come in all types of finishes, from simple colors to metallic finishes. Some have a clear plastic inlay, but I never use those – there isn’t enough room to put spacers between it and my stitching, and I worry that, over time, the stitching will get damaged. I have purchased lots of them from Ebay – it’s a convenient source all year long. Craft stores generally only carry them during the holiday season.
1. Some frames come with a pre-cut backing piece, if not, cut one (from foam board or acid free cardboard) to fit your frame.
2. Trim your stitching to fit the backing. Use a narrow bead of clue just around the very edge.
3. Place in frame and run a bead of glue around the edge to secure in place (or else you may constantly be replacing it – they tend to pop out!)
4. Ta-Da!
Of course, you can embellish the frame – use glitter, ribbon, lace, sequins, tiny buttons or charms.
And don’t overlook other re-purposed items for frames. I have some ornaments done years ago framed in wooden drapery rings (packed up at the moment, so no pics :-(.
And I like to use canning jar lids for a country look.

What is the most unusual ornament frame you have seen?
CDB is Home!
1 Comment
You can read the details on my other blog, Nita’s Notes.
